Thursday, October 15, 2015

BPS 3.5.0 Clustering Guide

Cluster Architecture

Server clustering is done mainly in order to achieve high availability and scalability.

High Availability

High availability means there is redundancy in the system such that service is available to outside world irrespective of individual component failures. For example, if we have a two node cluster, even if one node fails, the other node would continue to serve requests till the failed node is restored again.

Scalability

Scalability means increasing the processing capacity by adding more server nodes.

Load Balancer

Load balancing is the method of distributing workload to multiple server nodes.  In order to achieve proper clustering function you would require a Load Balancer. The function of the load balancer is to monitor the availability of the server nodes in the cluster and route requests to all the available nodes in a fair manner. Load balancer would be the external facing interface of the cluster and it would receive all the requests coming to the cluster. Then it would distribute this load to all available nodes. If a node has failed, then the load balancer will not route requests to that node till that node is back online.

WSO2 Business Process Server Cluster Architecture

In order to build a wso2 business process server cluster you would require the following.


  1.       Load balancer
  2.      Hardware / VM nodes for BPS Nodes
  3.      Database Server
Following diagram depicts the deployment of a two node WSO2 bps cluster.


Load Balancer will receive all the requests and distribute the load (Requests) to the two BPS nodes. BPS Nodes can be configured as manager node and worker node. A BPS cluster can have one manager node and multiple worker nodes. This is with respect to deployment of artifacts. The node that performances the artifact deployment first is considered manager and other nodes are considered workers.

BPS Manager Node / Worker Nodes

Manager node is where the workflow artifacts (Business processes / Human Tasks / BPMN artifacts ) are first deployed.  The worker nodes will look at the configuration generated by the master node for a given deployment artifact and then deploy those artifacts in its runtime.
WSO2 BPS requires this method of deployment because it does automatic versioning of the deployed bpel /human task artifacts. Hence, in order to have the same version number for a given deployment artifact across all the nodes, we need to do the versioning at one node (Master Node). A BPS server decides whether it is a manager node or a worker node by looking at its configuration registry mounting configuration. We will look at that configuration in detail later.

BPS and Registry

In the simplest terms, registry is an abstraction over a database schema. It provides an API using which you can store data and retrieve data to a database. WSO2 BPS embeds the registry component and hence has a build in registry.  Registry is divided into three spaces.

Local Registry

Local registry is used to store information local to a server node.

Configuration Registry

               Configuration Registry is used to store information that needs to be shared across same type of server nodes. For example, configuration registry is shared across BPS server nodes. However, this same configuration registry would not be shared across another type of server nodes.

Governance Registry


Governance Registry is used to store information that can be shared across clusters of different type of servers. For example governance registry can be shared across BPS and ESB cluster. In the above diagram, these different registry configurations are depicted as individual databases.
Note:
BPS Manager Node refers to the configuration registry using a Read/Write link while the BPS Worker nodes refer to the configuration registry using a Read/Only link.

BPS and User Store and Authorization

BPS management console requires a user to login to the system in order to do management activities. Additionally various permissions levels can be configured for access management. In human tasks, depending on the logged in user, what he can do with tasks will change.
All this access control/authentication/authorization functions are inherited to the BPS server from carbon kernel.  You can also configure an external LDAP/Active directory to grant users access to the server. All this user information / permission information is kept in the user store database. In the above diagram, UM DB refers to this database. This database is also shared across all the cluster nodes.

Activiti DB

BPS 3.5.0 introduces BPMN support by embedding popular Activiti BPMN engine. In order to to persist the bpmn packages, process instance information, BPS uses this db. Since we are embedding two process engines, Apache ode for BPEL and Activiti for BPMN, we have kept the activiti db separate.

BPS Persistence DB

BPS handles long running processes and human tasks. This means, the runtime state of the process instances/ human task instances have to be persisted to a database. BPS persistence database is the databases where we store these process / t ask configuration data and process / task instance state.


Configuring the BPS Cluster

Now that we have understood the individual components depicted in the above diagram, we can proceed to implement our BPS cluster.  I will break down the steps in configuring the cluster into following steps. Note that the only major difference between the manager node and worker node is in registry.xml configuration.
If you are using two machines (hardware or VM) all other configurations are identical for master node and slave node except IP addresses, ports and deployment synchronizer entry.  However, if you are configuring the cluster on the same machine for testing purpose , you will need to configure port offset in carbon.xml file  as port conflicts can occur.


  1. Create database schemas.
  2. Configure the master-datasource.xml  ( Registry and User Manager databases )
  3. Configure bps-datasources.xml  ( BPS Persistence database )
  4. Configure activiti-datasources.xml
  5. Configure registry.xml ( Different for master node and slave node)
  6. Configure user-mgt.xml
  7. Configure axis2.xml
  8. Configure bps.xml
  9. Configure carbon.xml
  10. Configure the server startup script

Creating database Schema's

WSO2 BPS supports the following major databases.
1.       Oracle
2.       MySQL
3.       MSSQL
4.       PostgreSQL
            In the above diagram, we have depicted 6 databases. We can use H2 as the local registry for each BPS Node. We can create one schema for registry and configure registry mounting configuration for configuration registry and governance registry. Also in most scenarios, we can use that same db schema for user store as well. Hence we will need to create additional db schemas for bps db ( bpel and human tasks persistence data ) and activiti_db ( bpmn instances and tasks persistence data ).


Database Schema Requirement
DB Name
Configuration/Governance Registry
REGISTRY_DB
User Store database
UM_DB
Activiti DB ( BPMN DB )
BPMN_DB
BPS Persistence database
BPS_DB


You can find the sql script for creating registry databases from wso2bps-3.5.0/dbscripts directory. Sql script for bps persistence database can be found at wso2bps-3.5.0/dbscripts/bps/create directory.The db script for creating activiti db can be found at wso2bps-3.5.0/dbscripts/bps/bpmn/create directory.


Following is an example of creating the db schema for mysql.


mysql> create database REGISTRY_DB;
mysql> use REGISTRY_DB;
mysql> source /dbscripts/mysql.sql;
mysql> grant all on REGISTRY_DB.* TO username@localhost identified by "password";


Download and copy the MySql connector to /repository/components/lib directory.


Configuring master-datasources.xml
You can configure data sources for registry and user store in master-datasources.xml file found in / repository/conf/datasources directory.


<datasources-configuration xmlns:svns="http://org.wso2.securevault/configuration">
 <providers>
<provider>org.wso2.carbon.ndatasource.rdbms.RDBMSDataSourceReader</provider>
 </providers>


 <datasources>
<datasource>
  <name>WSO2_CARBON_DB</name>
  <description>The datasource used for registry and user manager</description>
  <jndiConfig>
   <name>jdbc/WSO2CarbonDB</name>
  </jndiConfig>
  <definition type="RDBMS">
    <configuration>       <url>jdbc:h2:repository/database/WSO2CARBON_DB;DB_CLOSE_ON_EXIT=FALSE;LOCK_TIMEOUT=60000</url>
      <username>wso2carbon</username>
      <password>wso2carbon</password>
      <driverClassName>org.h2.Driver</driverClassName>
      <maxActive>50</maxActive>
      <maxWait>60000</maxWait>
      <testOnBorrow>true</testOnBorrow>
      <validationQuery>SELECT 1</validationQuery>
      <validationInterval>30000</validationInterval>
    </configuration>
  </definition>
</datasource>


<datasource>
  <name>WSO2_REGISTRY_DB</name>
  <description>The datasource used for registry- config/governance</description>
  <jndiConfig>
    <name>jdbc/WSO2RegistryDB</name>
  </jndiConfig>
  <definition type="RDBMS">
    <configuration>
      <url>jdbc:mysql://localhost:3306/REGISTRY_DB?autoReconnect=true</url>
      <username>root</username>
      <password>root</password>
      <driverClassName>com.mysql.jdbc.Driver</driverClassName>
      <maxActive>50</maxActive>
      <maxWait>60000</maxWait>
      <testOnBorrow>true</testOnBorrow>
         <validationQuery>SELECT 1</validationQuery>
      <validationInterval>30000</validationInterval>
    </configuration>
  </definition>
</datasource>


<datasource>
  <name>WSO2_UM_DB</name>
  <description>The datasource used for registry- local</description>
  <jndiConfig>
    <name>jdbc/WSO2UMDB</name>
  </jndiConfig>
  <definition type="RDBMS">
    <configuration>
      <url>jdbc:mysql://localhost:3306/UM_DB?autoReconnect=true</url>
      <username>root</username>
      <password>root</password>
      <driverClassName>com.mysql.jdbc.Driver</driverClassName>
      <maxActive>50</maxActive>
      <maxWait>60000</maxWait>
      <testOnBorrow>true</testOnBorrow>
      <validationQuery>SELECT 1</validationQuery>
      <validationInterval>30000</validationInterval>
    </configuration>
  </definition>
</datasource>
 </datasources>
</datasources-configuration>


Most of the entries are self-explanatory.


Configure bps-datasources.xml  ( BPS Persistence database )

Open /repository/conf/datasources/bps-datasources.xml and add the relevant entries such as database name, driver class and database connection url.  Following is the matching configuration for mysql.


       <datasource>
           <name>BPS_DS</name>
           <description></description>
           <jndiConfig>
               <name>bpsds</name>
           </jndiConfig>
           <definition type="RDBMS">
               <configuration>
                   <url>jdbc:mysql://localhost:3306/bps350</url>
                   <username>root</username>
                   <password>root</password>
                   <driverClassName>com.mysql.jdbc.Driver</driverClassName>
                   <testOnBorrow>true</testOnBorrow>
                   <validationQuery>SELECT 1</validationQuery>
                   <validationInterval>30000</validationInterval>
                   <useDataSourceFactory>false</useDataSourceFactory>
            <defaultAutoCommit>true</defaultAutoCommit>
            <maxActive>100</maxActive>
                   <maxIdle>20</maxIdle>
            <maxWait>10000</maxWait>
               </configuration>
           </definition>
       </datasource>

Note the following entry.


<defaultAutoCommit>true</defaultAutoCommit> is set to true. This is an important setting for bpel engine.


You need to do this for each node in the cluster.

Configure Activiti-datasources.xml

Open wso2bps-3.5.0/repository/conf/datasources/activiti-datasources.xml and add the relevant entries.

       <datasource>
           <name>ACTIVITI_DB</name>
           <description>The datasource used for activiti engine</description>
           <jndiConfig>
               <name>jdbc/ActivitiDB</name>
           </jndiConfig>
           <definition type="RDBMS">
               <configuration>
                   <url>jdbc:mysql://localhost:3306/BPMN_DB</url>
                   <username>root</username>
                   <password>root</password>
                   <driverClassName>com.mysql.jdbc.Driver</driverClassName>
                   <maxActive>50</maxActive>
                   <maxWait>60000</maxWait>
                   <testOnBorrow>true</testOnBorrow>
                   <validationQuery>SELECT 1</validationQuery>
                   <validationInterval>30000</validationInterval>
               </configuration>
           </definition>
       </datasource>

Configure registry.xml

Registry mount path is used to identify the type of registry. For example” /_system/config” refers to configuration registry and "/_system/governance" refers to governance registry. Following is an example configuration for bps mount. I will highlight each section and describe them below. I will only describe the additions to the registry.xml file below. Leave the configuration for local registry as it is and add following new entries.


Registry configuration for BPS manager node


<dbConfig name="wso2bpsregistry">
 <dataSource>jdbc/WSO2RegistryDB</dataSource>
</dbConfig>


<remoteInstance url="https://localhost:9443/registry">
 <id>instanceid</id>
 <dbConfig>wso2bpsregistry</dbConfig>
 <readOnly>false</readOnly>
 <enableCache>true</enableCache>
 <registryRoot>/</registryRoot>
 <cacheId>root@jdbc:mysql://localhost:3306/ REGISTRY_DB</cacheId>
</remoteInstance>


<mount path="/_system/config" overwrite="true">
 <instanceId>instanceid</instanceId>
 <targetPath>/_system/bpsConfig</targetPath>
</mount>


<mount path="/_system/governance" overwrite="true">
 <instanceId>instanceid</instanceId>
 <targetPath>/_system/governance</targetPath>
</mount>


We are identifying the data source we configured in the master datasources xml using the dbConfig entry and we give a unique name to refer to that datasource entry which is “wso2bpsregistry”;
         Remote instance section refers to an external registry mount. We can specify the read only/read write nature of this instance as well as caching configurations and registry root location. Additionally we need to specify cacheID for caching to function properly in the clustered environment. Note that cacheId is same as the jdbc connection URL to our registry database.
We define a unique name “id” for each remote instance which is then referred from mount configurations. In the above example, our unique id for remote instance is instanceId. In each of the mounting configurations, we specify the actual mount patch and target mount path.

Registry configuration for BPS worker node

<dbConfig name="wso2bpsregistry">
 <dataSource>jdbc/WSO2RegistryDB</dataSource>
</dbConfig>


<remoteInstance url="https://localhost:9443/registry">
 <id>instanceid</id>
 <dbConfig>wso2bpsregistry</dbConfig>
 <readOnly>true</readOnly>
 <enableCache>true</enableCache>
 <registryRoot>/</registryRoot>
 <cacheId>root@jdbc:mysql://localhost:3306/ REGISTRY_DB</cacheId>
</remoteInstance>


<mount path="/_system/config" overwrite="true">
 <instanceId>instanceid</instanceId>
 <targetPath>/_system/bpsConfig</targetPath>
</mount>


<mount path="/_system/governance" overwrite="true">
 <instanceId>instanceid</instanceId>
 <targetPath>/_system/governance</targetPath>
</mount>


This configuration is same as above with readOnly property set to true for remote instance configuration.


Configure user-mgt.xml

In the user-mgt.xml enter the datasource information for user store which we configured previously in master-datasoures.xml file. You can change the admin username and password as well. However, you should do this before starting the server.


<Configuration>
 <AddAdmin>true</AddAdmin>
 <AdminRole>admin</AdminRole>
 <AdminUser>
<UserName>admin</UserName>
<Password>admin</Password>
 </AdminUser>
 <EveryOneRoleName>everyone</EveryOneRoleName>
 <Property name="dataSource">jdbc/WSO2UMDB</Property>
</Configuration>

Configure axis2.xml

We use axis2.xml to enable clustering. We will use well known address (WKA) based clustering method. In WKA based clustering, we need to have a subset of cluster members configured in all the members of the cluster. Usually, we configure all members of the cluster in the members section of axis2.xml. At least one well known member has to be operational at all times.


<clustering class="org.wso2.carbon.core.clustering.hazelcast.HazelcastClusteringAgent"  enable="true">
 <parameter name="membershipScheme">wka</parameter>
 <parameter name="localMemberHost">127.0.0.1</parameter>
 <parameter name="localMemberPort">4000</parameter>
 <members>
<member>
  <hostName>10.100.1.1</hostName>
  <port>4000</port>
</member>
<member>
  <hostName>10.100.1.2</hostName>
  <port>4010</port>
</member>
 </members>
</clustering>


In Axis2.xml change enabled  parameter to true. Find the parameter  membershipSchema and set wka option. Then configure the localMemberHost and LocalMemberport Entries. Under the members section, add the host name and port for each wka member. As we have only two nodes in our sample cluster configuration, we will configure both nodes as WKA nodes.


Configure bps.xml

In bps.xml, you need to configure the following entries.


Enable distributed lock


<tns:UseDistributedLock>true</tns:UseDistributedLock>


This entry enables hazelcast based synchronizations mechanism in order to prevent concurrent modification of instance state by cluster members.


Configure scheduler threadpool size


<tns:ODESchedulerThreadPoolSize>0</tns:ODESchedulerThreadPoolSize>


Thread pool size should always be smaller than maxActive database connections configured in bps-datasources.xml file.When configuring the thread pool size allocate 10-15 threads per core depending on your setup. Then leave some additional number of database connections since bps uses database connections for management API as well.


Example settings for a two node cluster.


Consider that MySQL Server configured database connection size 250 and the maxActive entry in bps-datasources file for each node is set to 70. Then we can configure the scheduler thread pool size as


Thread Pool Size = {  (Max Active connections) /2  }  - 10


SchedulerTreadPool size for each node 25


Note that we divided the max active number of connections by two in order to allow similar number of db connections for bpel engine and human task engine. If you are not using human tasks, you do not need to divide the max active connections by 2.


Define a unique node id for each node in the cluster


<tns:NodeId>node1</tns:NodeId>


This value has to be a unique string for each node in the cluster.

Configure carbon.xml

If you want automatic deployment of artifacts across the cluster nodes, you can enable deployment synchronizer feature from carbon.xml.


<DeploymentSynchronizer>
 <Enabled>true</Enabled>
 <AutoCommit>true</AutoCommit>
 <AutoCheckout>true</AutoCheckout>
 <RepositoryType>svn</RepositoryType>
 <SvnUrl>http://10.100.3.115/svn/repos/as</SvnUrl>
 <SvnUser>wso2</SvnUser>
 <SvnPassword>wso2123</SvnPassword>
 <SvnUrlAppendTenantId>true</SvnUrlAppendTenantId>
</DeploymentSynchronizer>


Deployment synchronizer functions by committing the artifacts to the configured svn location from one node (Node with AutoCommit option set to true) and sending cluster messages to all other nodes about the addition / change of the artifact. When the cluster message is received, all other nodes will do an svn update resulting in obtaining the changes to relevant deployment directories. Now the server will automatically deploy these artifacts.
For the master node, keep AutoCommit and AutoCheckout entries as true. For all other nodes, change autoCommit entry to false.


Configure the server startup script

In the server startup script, you can configure the memory allocation for the server node as well as jvm tuning parameters.  If you open the wso2server.sh or wso2server.bat file located at the /bin directory and go to the bottom of the file , you will find those parameters.  Change them according to the expected server load.


Following is the default memory allocation for a wso2 server.


-Xms256m -Xmx1024m -XX:MaxPermSize=256m

Cluster artifact deployment best practices

  1. Always deploy the artifact on the manager node first and on worker nodes after some delay.
  2. Use deployment synchronizer if a protected svn repository is available in the network and your cluster has many nodes ( no of nodes > 4 )
  3. Otherwise you can use simple file copying to deploy artifacts

Saturday, April 25, 2015

Email testing with Greenmail

When an application provides support for sending and receiving emails we need to be able to write test cases to automate the verification of this functionality. Green mail  is a great library for Implementing this functionality. Greenmail provide support for various mail protocols such as smtp, smtps, pop3 , pop3s , imap and imaps.

You can start a Greenmail server to listen with all these protocols enabled and listening on localhost with two lines of code.

        GreenMail greenMail = new GreenMail();
        greenMail.start();


When the server is started as above, the default ports of the above supported protocols are offset by 3000.

SMTP    : 3025    SMTPS  : 3465   POP3     : 3110   POP3S   : 3995  IMAP    : 3143  IMAPS  : 3993

However, if you start the server as above, more often than not, there will be a port conflict with some other program resulting in exceptions. Therefore you can configure the GreenMail server with the ServerSetup object with the protocol , binding address and port.

 ServerSetup setup = new ServerSetup(3025, "localhost", "smtp");
 GreenMail greenMail = new GreenMail(setup);

You can register a user to the server by using setUser method.

greenMail.setUser("user1@mail.com", "user1", "user1");

In order to receive mails from greenmail server object, waitForIncomingEmail method is available.

greenMail.waitForIncomingEmail(5000, 1);
Message[] messages = greenMail.getReceivedMessages();

In order to find more details, take a look at the source code at https://github.com/greenmail-mail-test/greenmail

Following is a sample on how to send a mail using java mail and receive it using greenmail with user authentication enabled.

import com.icegreen.greenmail.util.GreenMail;
import com.icegreen.greenmail.util.ServerSetup;

import javax.mail.Message;
import javax.mail.MessagingException;
import javax.mail.PasswordAuthentication;
import javax.mail.Session;
import javax.mail.Transport;
import javax.mail.internet.InternetAddress;
import javax.mail.internet.MimeMessage;
import java.io.IOException;
import java.util.Properties;

public class GreenMailTest {

    public static void main(String[] args) throws InterruptedException, IOException, MessagingException {
        ServerSetup setup = new ServerSetup(3025, "localhost", "smtp");
        GreenMail greenMail = new GreenMail(setup);
        greenMail.setUser("user1@mail.com", "user1", "user1");
        greenMail.start();

        final String username = "user1";
        final String password = "user1";

        Properties props = new Properties();
        props.put("mail.smtp.auth", "true");
        props.put("mail.transport.protocol", "smtp");
        props.put("mail.smtp.host", "localhost");
        props.put("mail.smtp.port", "3025");

        Session session = Session.getInstance(props,
                                              new javax.mail.Authenticator() {
                                                  protected PasswordAuthentication getPasswordAuthentication() {
                                                      return new PasswordAuthentication(username, password);
                                                  }
                                              });

        Message message = new MimeMessage(session);
        message.setSubject("Mail Subject");
        message.setText("Mail content");
        message.setFrom(new InternetAddress("user1@mail.com"));
        message.setRecipients(Message.RecipientType.TO, InternetAddress.parse("user1@mail.com"));
        Transport.send(message);

        greenMail.waitForIncomingEmail(5000, 1);
        Message[] messages = greenMail.getReceivedMessages();
        System.out.println("Message length =>" + messages.length);
        System.out.println("Subject => " + messages[0].getSubject());
        System.out.println("Content => " + messages[0].getContent().toString());
        System.out.println("Done");
        greenMail.stop();
    }
}

Sunday, March 29, 2015

How to configure a ESB proxy service as a consumer to listen to two message broker queues

In this blog post, we will look at how we can configure multiple transport receivers and senders with WSO2 ESB and configure a proxy service to have multiple transport receivers.

In order to test our scenario, we need to start two message broker instances.

Lets configure active MQ to run as two instances.

1. Download activemq and extract it.
2. Run the following command to create an instance of it.

$ ./activemq create instanceA
$ ./activemq create instanceB


Running these two commands will create two directories inside activemq bin directory with configuration files and start-up scripts duplicated within them. Now we can modify the configuration files to use different ports so that when we start the two mq instances, there wont be port conflicts.

Open InstanceB/conf/activemq.xml file and modify the ports under transportConnectors.

<transportConnectors>
               <transportConnector name="openwire" uri="tcp://0.0.0.0:61616?maximumConnections=1000&amp;wireformat.maxFrameSize=104857600"/>
            <transportConnector name="amqp" uri="amqp://0.0.0.0:5682?maximumConnections=1000&amp;wireformat.maxFrameSize=104857600"/>
 </transportConnectors>


Now open jetty.xml in the same directory and modify the ui port from 8161 to different port.

Now we are ready to start the two activemq instances. 

cd instanceA/bin
./instanceA console

cd instanceB/bin
./instanceB console

Now we have two activemq instance running in console mode.

Log into activemq instanceA ui and create a queue named MyJMSQueue.
Similiary, log into activemq instanceB and create a queue with the same name.

Use http://localhost:8161/admin and username and password admin for defaults.

Now, we have done our configurations for activemq broker.

Now copy the following jar files to repository/components/lib directory of ESB.

activemq-broker-5.8.0.jar
activemq-client-5.8.0.jar
geronimo-j2ee-management_1.1_spec-1.0.1.jar
geronimo-jms_1.1_spec-1.1.1.jar
hawtbuf-1.9.jar


Configuring axis2.xml

Now go to repository/conf/axis2/axis2.xml and uncomment jms transport section for activemq and duplicate it with a transport named jms1. Make sure to update the provider url port with the value you specified in activemq.xml. My configuration looks like the following.

<transportReceiver name="jms" class="org.apache.axis2.transport.jms.JMSListener">
        <parameter name="myTopicConnectionFactory" locked="false">
                <parameter name="java.naming.factory.initial" locked="false">org.apache.activemq.jndi.ActiveMQInitialContextFactory</parameter>
                <parameter name="java.naming.provider.url" locked="false">tcp://localhost:61616</parameter>
                <parameter name="transport.jms.ConnectionFactoryJNDIName" locked="false">TopicConnectionFactory</parameter>
                    <parameter name="transport.jms.ConnectionFactoryType" locked="false">topic</parameter>
        </parameter>

        <parameter name="myQueueConnectionFactory" locked="false">
                <parameter name="java.naming.factory.initial" locked="false">org.apache.activemq.jndi.ActiveMQInitialContextFactory</parameter>
                <parameter name="java.naming.provider.url" locked="false">tcp://localhost:61616</parameter>
                <parameter name="transport.jms.ConnectionFactoryJNDIName" locked="false">QueueConnectionFactory</parameter>
                    <parameter name="transport.jms.ConnectionFactoryType" locked="false">queue</parameter>
        </parameter>

        <parameter name="default" locked="false">
                <parameter name="java.naming.factory.initial" locked="false">org.apache.activemq.jndi.ActiveMQInitialContextFactory</parameter>
                <parameter name="java.naming.provider.url" locked="false">tcp://localhost:61616</parameter>
                <parameter name="transport.jms.ConnectionFactoryJNDIName" locked="false">QueueConnectionFactory</parameter>
                    <parameter name="transport.jms.ConnectionFactoryType" locked="false">queue</parameter>
        </parameter>
    </transportReceiver>

    <transportReceiver name="jms1" class="org.apache.axis2.transport.jms.JMSListener">
        <parameter name="myTopicConnectionFactory1" locked="false">
                <parameter name="java.naming.factory.initial" locked="false">org.apache.activemq.jndi.ActiveMQInitialContextFactory</parameter>
                <parameter name="java.naming.provider.url" locked="false">tcp://localhost:61636</parameter>
                <parameter name="transport.jms.ConnectionFactoryJNDIName" locked="false">TopicConnectionFactory</parameter>
                    <parameter name="transport.jms.ConnectionFactoryType" locked="false">topic</parameter>
        </parameter>

        <parameter name="myQueueConnectionFactory1" locked="false">
                <parameter name="java.naming.factory.initial" locked="false">org.apache.activemq.jndi.ActiveMQInitialContextFactory</parameter>
                <parameter name="java.naming.provider.url" locked="false">tcp://localhost:61636</parameter>
                <parameter name="transport.jms.ConnectionFactoryJNDIName" locked="false">QueueConnectionFactory</parameter>
                    <parameter name="transport.jms.ConnectionFactoryType" locked="false">queue</parameter>
        </parameter>

        <parameter name="default" locked="false">
                <parameter name="java.naming.factory.initial" locked="false">org.apache.activemq.jndi.ActiveMQInitialContextFactory</parameter>
                <parameter name="java.naming.provider.url" locked="false">tcp://localhost:61636</parameter>
                <parameter name="transport.jms.ConnectionFactoryJNDIName" locked="false">QueueConnectionFactory</parameter>
                    <parameter name="transport.jms.ConnectionFactoryType" locked="false">queue</parameter>
        </parameter>


Now start ESB and deploy the following proxy service.

<proxy xmlns="http://ws.apache.org/ns/synapse"
       name="JMSListenerProxy"
       transports="jms jms1"
       startOnLoad="true"
       trace="disable">
   <description/>
   <target>
      <inSequence>
         <log level="full"/>
         <drop/>
      </inSequence>
   </target>
   <parameter name="transport.jms.Destination">MyJMSQueue</parameter>
</proxy>

Now if you publish message to queue MyJMSQueue of either activemq instance, you will notice that the message is consumed by our proxy service and logged.

How does it work ?

In our scenario, since we are going to have to have different configurations for transports jms and jms1, we cannot specify the connection factory details in the proxy service itself. Hence we have resorted to use the default configurations specified in the axis2.xml.

However, we can specify the jms destination name in our proxy service. This make sense as this kind of approach would only be required for mq high availability scenario and hence we can afford to have the same queue name for both message broker instances. 

Saturday, March 28, 2015

How to configure IBM MQ 8 With WSO2 ESB

In this blog post, we will look at how to configure IBM MQ version 8 with WSO2 ESB and implement a proxy service to consume messages from a queue in IBM MQ.

Following are the steps we need to follow in order to configure ESB and implement our proxy service. 


1. Create the relevant JMS Administrative objects in IBM MQ.
2. Generate the JNDI binding file from IBM MQ
3. Configure WSO2 ESB JMS transport with the generated binding file and connection factory information.
4. Implement the proxy service and deploy it.
5. Publish a message to MQ and observe how it is consumed by ESB.

Create Queue Manager and Queue and Server Connection Channel in MQ

Step1.

Start the Web Sphere MQ Explorer. If you are not running on an administrator account, right click on the icon and select Run as Administrator option.


Step 2.

Click on the Queue Managers and Select New => Queue Manager to create a new queue manager.

We will name the queue manager as ESBQManager. Select create server connection channel option as you pass through the wizard with next button. You will get the option to specify the port this queue manager will use. Since we do not have any queue managers at the moment, we can use the default 1414 port.


Now we have created a queue manager object. Next we need to create a local queue which we will used to publish massages and consume from ESB. Lets name this queue as LocalQueue1.

Expand newly created ESBQManager and click on Queues and select New => Local Queue.


We will use default options for our local queue.

Next we need to create a server connection channel which will be used to connect to the queue manager.

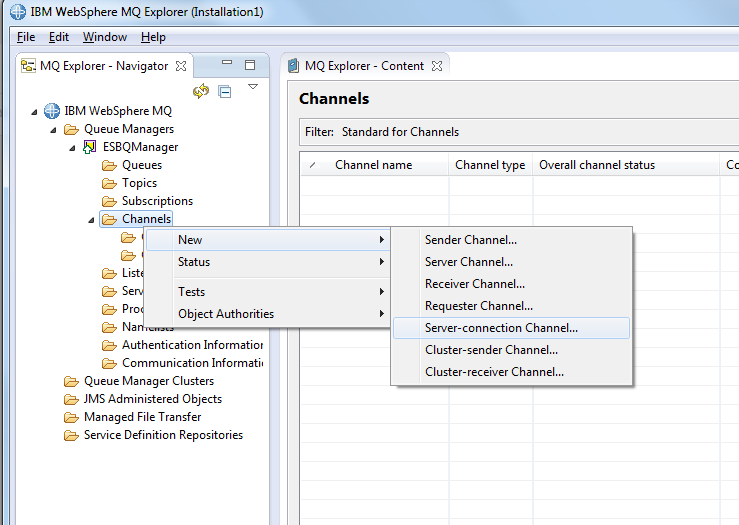
Select Channels => New => Server-connection Channel option and give the channel name mychannel. Select default options for creating the channel.


Now we have created our queue manager, queue and server connection channel.

Generating the binding file

   Next we need to generate the binding file which will be used by IBM MQ client libraries for JNDI Look-up.  For that, we need to first create a directory where this binding file will be stored. I have created a directory named G:\jndidirectory for this purpose. 

Now go to MQ Explorer, click on JMS Administered Objects and select Add Initial Context.


In the connection details wizard, select File System option and browse to our newly created directory and click next and click finish.


Now, under the JMS Administered objects, we should be able to see our file initial context.


Expand it and click on Connection Factories to create a new connection factory.


We will name our connection factory as MyQueueConnectionFactory. For the connection factory type, select Queue Connection Factory.


Click next and click finish. Now Click on the newly created Connection Factory and select properties. Click on the connections option, browse and select our queue manager. You can also configure the port and the host name for connection factory. Since we used default values, we do not need to do any changes here. 


For the other options, go with the defaults. Next , we need to create a JMS Destination. We will use the same queue name LocalQueue1 as our destination and map it to our queue LocalQueue1 . Click on Destinations and select New => Destination. and provide name LocalQueue1. When you get the option to select the queue manager and queue browse and select ESBQManager and LocalQueue1 .


Now we are done with creating the Initial Context. If you now browse to the directory we specified, you should be able to see the newly generated binding file.


In order to connect to the Queue, we need to configure channel authentication. For the ease of use, lets disable channel authentication for our scenario. For that run the command runmqsc from the command line and execute the following two commands. Note that you have to start command prompt as admin user.

runmqsc ESBQManager

ALTER QMGR CHLAUTH(DISABLED)

REFRESH SECURITY TYPE(CONNAUTH)


Now we are done with configuring the IBM MQ.  

Configuring WSO2 ESB JMS Transport. 


open axis2.xml found in wso2esb-4.8.1\repository\conf\axis2 directory and add the following entries to it near the commented out jms transport receiver section.

<transportReceiver name="jms" class="org.apache.axis2.transport.jms.JMSListener">
  <parameter name="default" locked="false">
    <parameter name="java.naming.factory.initial" locked="false">com.sun.jndi.fscontext.RefFSContextFactory</parameter>
    <parameter name="java.naming.provider.url" locked="false">file:/G:/jndidirectory</parameter>
    <parameter name="transport.jms.ConnectionFactoryJNDIName" locked="false">MyQueueConnectionFactory</parameter>
    <parameter name="transport.jms.ConnectionFactoryType" locked="false">queue</parameter>
    <parameter name="transport.jms.UserName" locked="false">nandika</parameter>
    <parameter name="transport.jms.Password" locked="false">password</parameter>
  </parameter>

  <parameter name="myQueueConnectionFactory1" locked="false">
    <parameter name="java.naming.factory.initial" locked="false">com.sun.jndi.fscontext.RefFSContextFactory</parameter>
    <parameter name="java.naming.provider.url" locked="false">file:/G:/jndidirectory</parameter>
    <parameter name="transport.jms.ConnectionFactoryJNDIName" locked="false">MyQueueConnectionFactory</parameter>
    <parameter name="transport.jms.ConnectionFactoryType" locked="false">queue</parameter>
    <parameter name="transport.jms.UserName" locked="false">nandika</parameter>
    <parameter name="transport.jms.Password" locked="false">password</parameter>
  </parameter>
</transportReceiver>

Similarly add jms transport sender section as follows.

<transportSender name="jms" class="org.apache.axis2.transport.jms.JMSSender">
  <parameter name="default" locked="false">
    <parameter name="java.naming.factory.initial" locked="false">com.sun.jndi.fscontext.RefFSContextFactory</parameter>
    <parameter name="java.naming.provider.url" locked="false">file:/G:/jndidirectory</parameter>
    <parameter name="transport.jms.ConnectionFactoryJNDIName" locked="false">MyQueueConnectionFactory</parameter>
    <parameter name="transport.jms.ConnectionFactoryType" locked="false">queue</parameter>
    <parameter name="transport.jms.UserName" locked="false">nandika</parameter>
    <parameter name="transport.jms.Password" locked="false">password</parameter>
  </parameter>

  <parameter name="myQueueConnectionFactory1" locked="false">
    <parameter name="java.naming.factory.initial" locked="false">com.sun.jndi.fscontext.RefFSContextFactory</parameter>
    <parameter name="java.naming.provider.url" locked="false">file:/G:/jndidirectory</parameter>
    <parameter name="transport.jms.ConnectionFactoryJNDIName" locked="false">MyQueueConnectionFactory</parameter>
    <parameter name="transport.jms.ConnectionFactoryType" locked="false">queue</parameter>
    <parameter name="transport.jms.UserName" locked="false">nandika</parameter>
    <parameter name="transport.jms.Password" locked="false">password</parameter>
  </parameter>
</transportSender>

Since we are using IBM MQ queue manager default configuration, it is expecting username password client authentication. Here, the username and password is the login information of your logged in operating system account.


Copy MQ client libraries to respective directories.


Copy jta.jar and jms.jar to repository/components/lib directory.
Copy com.ibm.mq_2.0.0.jar and fscontext_1.0.0.jar to repository/components/dropins directory. Download the jar files from here.

Deploy JMSListener Proxy Service.

Now start esb and deploy the following simple proxy service. This proxy service act as a listener to our queue LocalQueue1 and when ever we put a message to this queue, the proxy service will pull that message out of the queue and log it.

<proxy xmlns="http://ws.apache.org/ns/synapse"
       name="MyJMSProxy"
       transports="jms"
       startOnLoad="true"
       trace="disable">
   <description/>
   <target>
      <inSequence>
         <log level="full"/>
         <drop/>
      </inSequence>
   </target>
   <parameter name="transport.jms.Destination">LocalQueue1</parameter>
</proxy>

Testing our proxy service

Go to MQ Explorer and add a message to local queue. 


Now you will be able to see the message logged in ESB console as well as in the log file.

Enjoy JMS with IBM MQ